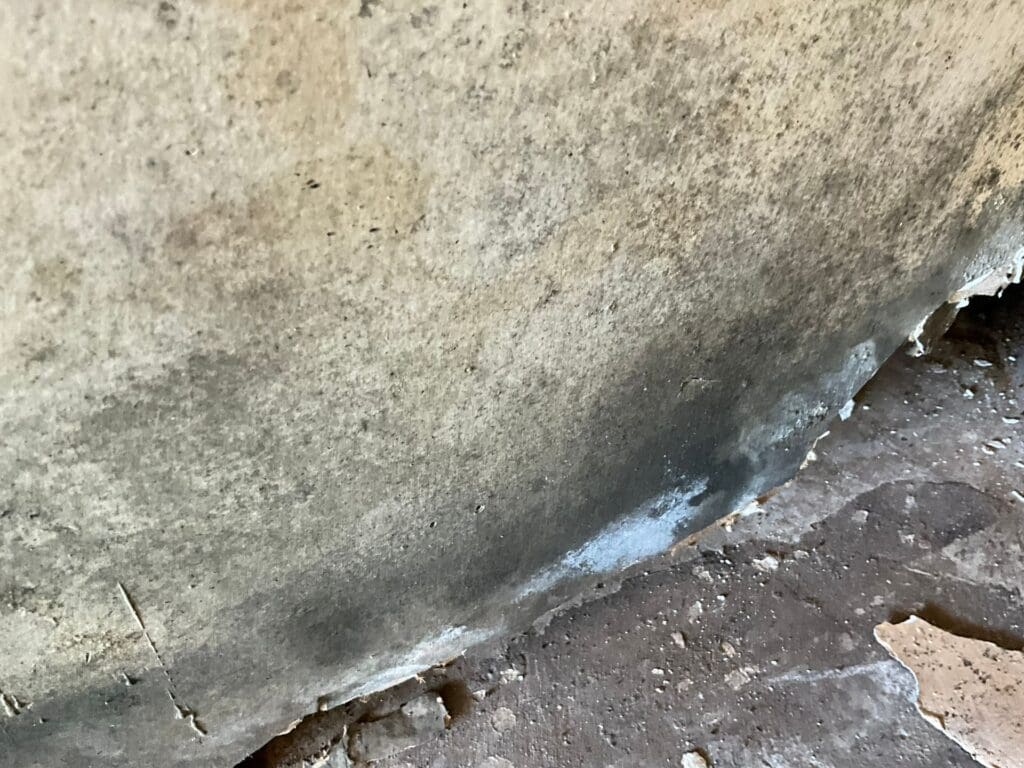
Here’s an example scenario: a homeowner in Grovetown spent $6,000 on crawl space encapsulation last year. The contractor installed a vapor barrier on the floor, sealed the vents, and left. Six months later, the homeowner smells mold again. A moisture check reveals 78% relative humidity in the sealed crawl space and mold growing on the floor joists directly above the new vapor barrier.
The encapsulation wasn’t wrong. It was incomplete. The contractor sealed the space but didn’t install a dehumidifier, didn’t address a drainage issue near the foundation wall, and didn’t extend the vapor barrier up the walls. The sealed, unventilated crawl space with no mechanical dehumidification became a humidity trap.
Crawl space encapsulation works. But “works” has conditions.
The Problem Encapsulation Solves
In the Augusta area and throughout the CSRA, crawl spaces are the single most common source of residential mold problems. The reasons are straightforward and connected to Georgia’s climate and geology.
Georgia’s red clay soil retains water. After rain, moisture migrates through the soil and evaporates upward through exposed dirt floors in crawl spaces. Simultaneously, warm, humid outdoor air enters through foundation vents. In summer, when outdoor dewpoints regularly exceed 70°F, that humid air contacts cooler surfaces inside the crawl space (floor joists, ductwork, subfloor sheathing) and condensation forms.
The EPA states that mold requires moisture, a food source (wood, paper, dust), and moderate temperatures to grow. A typical Georgia crawl space provides all three for most of the year.
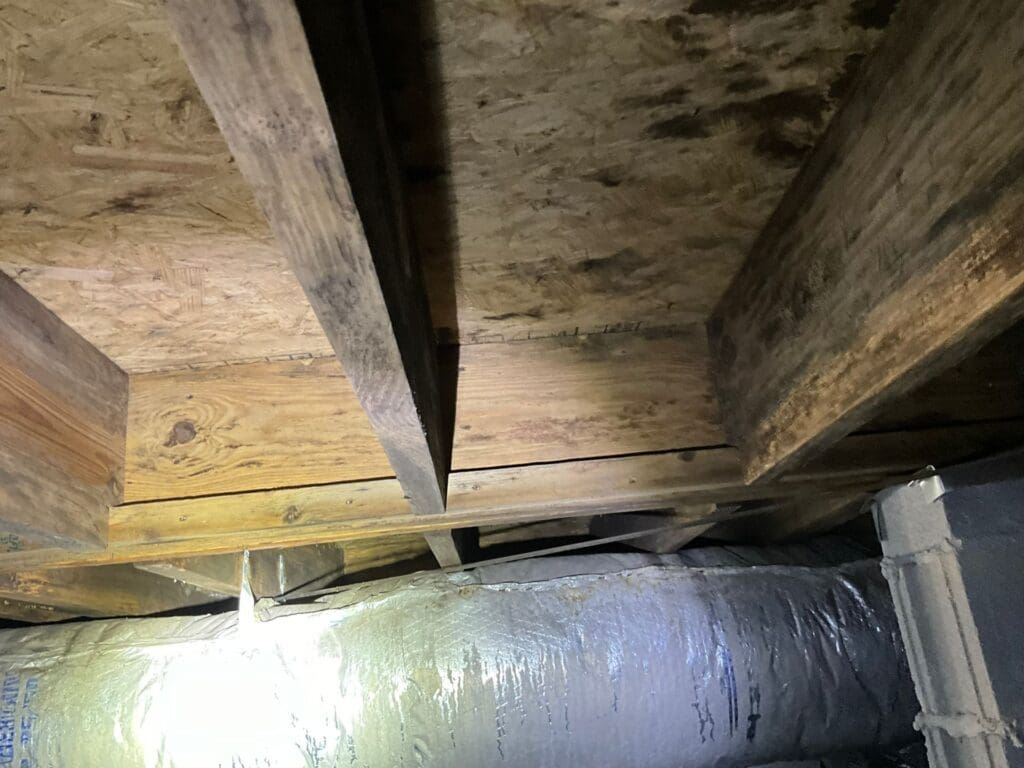
The result is predictable: mold on floor joists, mold on subfloor sheathing, mold on HVAC ductwork, and that distinctive musty smell that migrates upward into the living space. Research from Advanced Energy found that up to 40% of the air in a home’s first floor comes from the crawl space, carrying moisture, mold spores, and odors with it. The CDC notes that mold exposure can cause respiratory symptoms, nasal congestion, and throat irritation, particularly in occupants with asthma or allergies — a meaningful concern when that airflow is coming from a mold-affected crawl space.
What Encapsulation Actually Involves
Proper crawl space encapsulation converts a vented, exposed crawl space into a sealed, conditioned space. When done correctly, it includes:
Heavy-Duty Vapor Barrier
A polyethylene vapor barrier, typically 12 to 20 mil thick, covers the entire crawl space floor and extends up the foundation walls to a point above the exterior grade line. Seams are overlapped and sealed with tape or adhesive. The barrier is attached to the foundation walls with mechanical fasteners or adhesive.
The barrier blocks moisture evaporation from the soil, which is the largest single moisture source in most crawl spaces. A 6-mil polyethylene sheet (common in older installations) is too thin and tears easily. Proper encapsulation uses commercial-grade material.
Vent Sealing
Foundation vents are closed and sealed. This is the step that seems counterintuitive to many homeowners. For decades, building codes required vented crawl spaces based on the theory that airflow would keep crawl spaces dry. Research has shown this is wrong for humid climates. In the Southeast, venting a crawl space brings in warm, humid air that condenses on cooler surfaces, making the crawl space wetter, not drier.
The 2009 International Residential Code included provisions allowing unvented crawl spaces with specific conditions, including vapor barriers and mechanical ventilation or conditioning. Georgia has adopted these provisions.
Mechanical Dehumidification
This is the element most commonly omitted by contractors trying to keep costs down, and it’s the element most commonly responsible for failed encapsulations.
Sealing the crawl space stops the two largest moisture sources (soil evaporation and humid outdoor air), but it doesn’t eliminate all moisture. Minor seepage, condensation on pipes, and residual moisture in building materials all contribute to humidity. Without a dehumidifier to manage residual moisture, a sealed crawl space can still maintain humidity levels above 60%, which supports mold growth.
A commercial-grade crawl space dehumidifier sized for the space maintains relative humidity below 50 to 55%, which is below the threshold for mold growth. The dehumidifier runs automatically based on a built-in humidistat.
Drainage (When Needed)
If the crawl space has standing water or active water entry through the foundation walls, drainage must be addressed before encapsulation. This might involve installing a sump pump, interior french drains, or addressing exterior grading and downspout discharge. Laying a vapor barrier over standing water doesn’t solve anything; it hides the problem.
Wall Insulation (Optional)
Some encapsulation systems include rigid foam insulation on the foundation walls. This improves energy efficiency and prevents condensation on cold foundation surfaces during winter. It’s a beneficial addition but not strictly necessary for mold prevention.
What Proper Encapsulation Costs
For a typical crawl space in the Augusta area (800 to 1,500 square feet):
- Basic encapsulation (heavy vapor barrier, vent sealing): $3,000 to $6,000
- With dehumidifier: Add $1,500 to $2,500 for a commercial unit with installation
- With drainage work: Add $2,000 to $5,000 depending on complexity
- With wall insulation: Add $1,500 to $3,000
Total cost for a thorough encapsulation with dehumidification: $5,000 to $10,000. This is a significant investment, but it’s a one-time improvement with lasting benefits for both mold prevention and energy efficiency.
Does It Actually Work?
Yes, when all the necessary components are in place. Research from the Building Science Corporation and studies funded by the Department of Energy have consistently shown that sealed, conditioned crawl spaces maintain lower humidity levels, experience fewer mold problems, and use less energy than vented crawl spaces in humid climates.
The key variables that determine success:
Vapor barrier quality and installation. Thin barriers that tear, gaps at seams, and barriers that don’t extend up the walls leave moisture pathways open.
Mechanical dehumidification. Non-negotiable in the Southeast. A sealed crawl space without a dehumidifier will eventually have humidity problems.
Drainage. If water is actively entering the crawl space, encapsulation without drainage is covering up a flood. The water will find its way back.
Existing mold. Encapsulating over existing mold growth doesn’t kill the mold. It seals it in. Any active mold should be remediated before encapsulation.
When Testing Matters
Before encapsulation: If you suspect mold in your crawl space, get it tested before encapsulation. Air sampling and surface sampling establish whether mold is present, what species, and at what concentration. This determines whether remediation is needed before the crawl space is sealed.
After encapsulation: Post-encapsulation testing confirms that the encapsulated space is maintaining acceptable conditions. This is particularly useful 3 to 6 months after installation, once the system has been through at least one high-humidity season.
What to Do
-
If you’re considering encapsulation, get multiple quotes and ask specifically about dehumidification. If a contractor’s quote doesn’t include a dehumidifier, ask why. “You won’t need one” is usually wrong in this climate.
-
Address water entry before sealing. If your crawl space has standing water after rain, that’s a drainage problem that encapsulation alone won’t solve.
-
Test first if you smell mold. Don’t seal over a problem. Identify it, remediate it, and then encapsulate to prevent recurrence.
If you want to know what’s happening in your crawl space before committing to encapsulation, the EnviroPro 360 team can assess moisture levels, mold conditions, and help you determine the right scope of work. Reach out here and we’ll take a look.